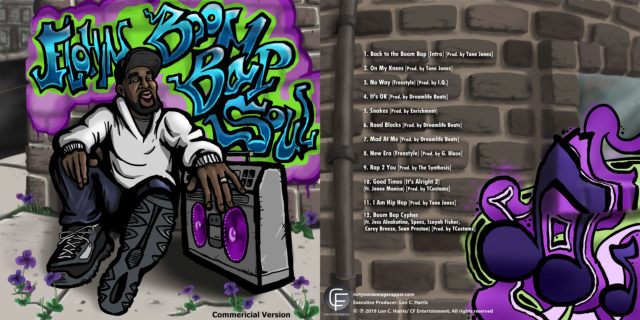
In this beat making video I step through the creation of sampled Hip Hop beat “Forever” (prod. by TCustomz).The full-length, high-quality, untagged instrumental is available for stream and license with instant delivery at www.TCustomz.com
If you enjoyed this video, feel free to “LIKE”, “SHARE” and COMMENT. Happy beat making!
We are happy to announce the brand new TCustomz Facebook app is now live! Shout out to Euphony Beat Store for the awesome template.
What can I do with this interactive app?
- Stream & License High Quality Hip Hop Beats w/ Instant Delivery
- Purchase Hard-hitting Drum Samples w/ Instant Delivery
- Preview Testimonials from our happy customers
- Claim your FREE gifts w/ Instant Delivery
- Watch our Beat Making Videos & Producer Tips & Tutorials
CLICK HERE to view it LIVE
In this video, I give a few tips for picking the right samples to use in your beats.
Feel free to drop a comments below and share your experience.
DOWNLOAD the FREE “TCustomized” Ableton Live Template Set below
Video Transcript:
It’s producer TCustomz, with TCustomz.com. And today I want to talk about how to change the default Ableton Live template set, and hopefully by doing that it will allow you to keep your beat sessions more organized and really help you delve into making music a lot quicker.
So by default, the Live session only includes a single audio track and a single MIDI track. And that will do okay to get you started, but ideally you want to create a custom set to complement your own work flow. Just to show you an example, let me open up one of my customized sets, and let you see what I’m talking about.
So this is the main template that I use for most of beat sessions. And what you see over here on the right is I’ve grouped together a bunch of different instruments. I’ve got my drums separated from my hi hats, percussion, etc. I’ve got an audio track down here that’s just called “sample” because I do a lot of sample-based production. So this is just an audio track for me to drag over a sample and then I can do my slicing and everything from this.
Under the drums you’re going to see the first track is just an audio track – if I wanted to drag over some sort of a drum break or any kind of audio samples. And then the rest of what you’re going to see is – these are all MIDI tracks, and in each of them I have loaded a drum rack. And it’s kind of the same principle I used for the rest of these – I’ve got an audio track, and then I’ve got other MIDI tracks with drum racks in them.
It really does a lot of the initial administrative work for you. You already have that ready – you save this as a template and then you’re ready to go. You’ve already got your tracks – you can just drag over the samples – whatever you’re going to use, whatever sounds, and you’re ready to go. You don’t have to worry about creating a new MIDI track and then dragging over a drum rack and all that sort of thing.
Now you might ask: Why can’t you just put all of your drum sounds, for instance, into a single drum rack? A kick, snare – why do you need independent drum racks for each of those sounds?
The quick answer is you can – you can put them all in a single drum rack. The problem is when you start going into the mixing phase and you’re trying to tweak individual sounds within a single drum rack. When you have them separated – when you switch over into the session view, you’ve already got your controls over each of the sounds independently. So that’s really the main reason that I like to separate them out, so I’m already ready when I go into the mix – I don’t have to worry about separating instruments, and that sort of thing.
So this isn’t to limit you – to put you into a box or constraint by doing this. It’s really to give you a basis to start from and foundation to work with when you’re making your beats. I know everybody does their own style of production and everyone has their own preferences and style workflow, so you obvious would need to tailor this to whatever is best suited for you and your production.
Once you have a template set customized, to Save your Template all you have to do is go to “Options” > “Preferences” > File Folder > “Save” Current Set as Default. And that saves the set. So every time you start a new Ableton session, it will launch that set for you.
Also, to Create a “Group” for your Ableton session:
- “Select” all of the tracks you would like included into the group (audio and/or MIDI)
- “Right Click” > “Group Tracks”
- Note: You can also “Name” your group and change the color to make it stand out
Overall, my recommendation would be to experiment with creating a customized set – play with some of the different things and figure out what’s best suited for you.
What I’m also going to do is include this custom set for free download (scroll to top) – that way you can play around with it and see what I did. It’s not anything too complicated, but like I said it’s just a foundation to work with versus using the single-audio, single-MIDI default session.
In summary, I really think putting one of these customized sets together is worth while. It’s definitely going to help you stay organized and really help you speed up your workflow and put together music a lot quicker than you normally would.
If you have a questions or comments, feel free to drop them below.
I’m back with another sampled Hip Hop beat making tutorial. In this video, I break down the process I went through to make the instrumental “No Illusion”. Hopefully this will offer some additional insight into my beat making process, rather than just another re-creation video.
The full-length, HQ & untagged beat, “No Illusion”, is available for INSTANT DOWNLOAD at www.TCustomz.com
Video Transcript:
What’s up guys? I just finished up this new beat. And for this video I kind of want to break down the beat a little more and not just re-create it. But actually give some commentary and show the process that went into the beat.
Alright, so I started with the sample. That’s how most of my beats come together – find a sample first, or if I’m going to make a composed beat, start with a basic melody and then build from that. So here’s a little preview of the sample that I used. *Plays sample snippet*
So the main sequence from the beat used that part of the sample, and then towards the end I actually picked some more of the guitar and made another sequence with that. So I went ahead and chopped up the sample *Previews sample chops*
I didn’t know what I wanted to do with it or even what kind of drum pattern I wanted to do. So what I did first was I went and I found a drum break to start and just kind of give a foundation for the overall groove of the track and beat. And the drum break sounds like this. *Plays original drum break snippet*
You can probably hear the bass in that drum break, the bass starts coming in pretty early. So I ended up just using the first… not even the first bar. I ended up taking a piece from the earlier part and making it into a one-bar loop. And once I had the one-bar loop, I figured out that the tempo for the break was right around 87 BPM. So that’s what I set the BPM for on my beat. It wasn’t exact, so what I ended up doing was using the Ableton warp engine to kind of warp my main kicks and snares, and make sure the they’re on the grid and that everything lines up. And then just let all of the ghost notes and everything fill in between. So after I did that, this is what it sounds like. *Previews modified break-beat*
So then I started working with the sample. And overall, you’ll hear that I used the main melody as it was kind of in the sample. But I didn’t just loop it. I had to do a lot of precision work on the chops to make sure everything fit. And then you’ll hear some fill-in notes… that I kind of did a reverse effect on to fill in some gaps, because like I said it wasn’t just a loop. So here’s what the first sequence sounds like *Previews first beat sequence*
And like I mentioned, towards the end of the sample, I ended up chopping up some more of the guitar and that’s what I made my second sequence from. Here’s some of the chops *Triggers sample chops from pads on MPD32 controller* - And this is how the second sequence came together *Plays second beat sequence”
Once I had my two main sequences and the drum break going – the overall groove and structure for the beat – I went ahead and beefed up the drum sounds. I ended up running a parallel, or New York style, compression for the drum break just to kind of emphasize some of the main kick and snare notes, just to give it a little more substance. And then to make it stand out even more, I ended up layering a kick and snare underneath of the drum break to emphasize those main notes. So here’s the break *Plays newly processed drum break* – The snare snaps a little more… and bring in the sample. *Plays first beat sequence*
So next in line was a bass line. I just ended up making a pretty simple bassline, just to give it some low end. And so from that point, it was basically just to fully sequence and arrange everything out, and make it into sort of like a song structure – maybe give it a hook or something. I ended up using the first sequence overall, for the main verse – for the 16s, and then the second sequence was my eight for the hook.
This wasn’t a crazy complicated beat in terms of the number of sounds that were used – sample, drum break, kick and snare, and bass – but I spent a lot of time trying to get my chops right. I don’t like my chops to be sloppy. And then definitely having that second sample sequence breaks up the monotony and doesn’t necessarily require you to add a lot of crazy extra instrumentation or anything like that.
So that’s pretty much it. That was pretty much the process for this beat. I hope that offers you all some insight. Again, drop a comment and let me know what you think. If this was helpful – if I talked about something that you want more details on, drop a comment and let me know.
I’ll catch you guys in the next video. Thanks for watching! Peace. *Final beat plays at end*
First off, I just want to say thanks to everyone who participated in this Facebook contest. It was really awesome to see that many producers get involved!
To participate in future contests like this one, make sure to “LIKE the Facebook Page & “FOLLOW” @TCustomz on Twitter.
Watch the Results Video here:
Video Transcript:
What’s up guys? It’s TCustomz with TCustomz Productionz. And we just wrapped up this 48 hour producer contest that was held on our Facebook page. All you had to do to enter was “LIKE” the page – http://www.facebook.com/tcustomzproductionz and “SHARE” the contest photo that was posted there as well.
The prize for this contest was the newest sound kit that was released on TCustomz.com, it’s the Vox Sample Kit Vol. 1. For more information on the sounds – what included in the kit, you can watch the demonstration video that was put together for this.
I definitely want to give a big shout out to everyone who entered. There were over sixty entries and I appreciate each and every one of you guys that contributed and participated.
So the winner of this contest was selected at random. And the winner is Jay Fittz! Congratulations to you – you should be expecting a download link soon.
If you’re interested in participating in future contests, make sure to “LIKE” the Facebook Page and “FOLLOW” @TCustomz on Twitter – and that way you’ll be updated on all the new promotions and contests that we have going on.
So that’s pretty much it. Again, thanks to everybody who participated and congrats again to Jay Fittz for winning the TCustomz Vox Sample Kit Vol. 1.
Until next time, happy beat making. I’m out.. Peace!
Producers, this is your chance to win the TCustomz Productionz Vox Sample Kit Vol. 1 for FREE!!! This brand new kit contains 100 soul and funk vocal samples excellent for Hip Hop music production. This contest ends in only 48 hours 8 hours, so HURRY!
DETAILS OUTLINED BELOW
HOW TO ENTER:
- “LIKE” our Facebook Page (if you have not already done so)
- “SHARE” the Facebook contest photo
- Optional: To make sure your entry was recorded, please private message us on our Facebook page after you have completed steps 1 & 2.
That’s it! This contest ends on Sunday, 4/21 at 11:59PM EST and any entries after that time will not be counted.
A winner will be announced and awarded their prize Monday evening (4/22).
Good luck!
Travis Cole
Chief Executive Officer
TCustomz Productionz, LLC
www.TCustomz.com
WATCH THE CONTEST RESULTS VIDEO HERE
Shout out to Hotta Fire Torch for sending in his new single “You Never Know” (prod. by TCustomz). If you like what you hear below, make sure to support the artist and purchase the single on iTunes here.
I just finished up a new Hip Hop beat, entitled “False Hopes”, with emcee Evidence of the Dilated Peoples in mind. And I also made a short teaser video to go along with it.
The full-length, high quality version of this beat is available for Stream or Download at www.TCustomz.com.
FREE BEAT & DRUM KIT!
NOTE: If you did NOT receive your free gifts via email, please make sure to check your spam/junk folder.


Simply tell us where to send your FREE Beat & Drum Kit below!
NO WAIT. INSTANT DELIVERY!
"LIKE" our Facebook Page as a way of saying thank you! Plus receive updates, discounts, music tips, & more!
Recent Posts
- Sample Hip Hop Beat Making Video – “Forever” (prod. by TCustomz)
- New TCustomz Productionz Facebook App!
- Sampling Tip: How to Pick an Appropriate Sample for your Beat
- Low End Theory – How To Filter a Bass Line for a Sampled Hip Hop Beat Tutorial
- How to Change the Default Ableton Live Template Set (Tutorial) & FREE Custom Set


