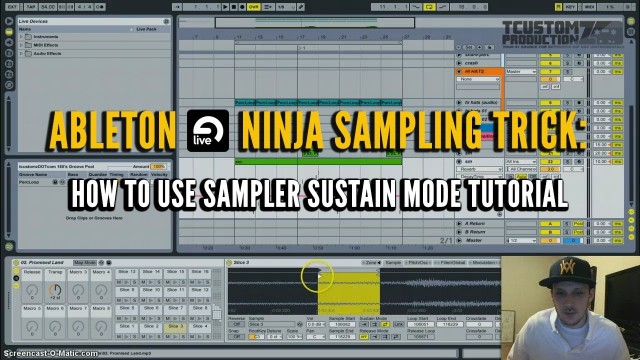
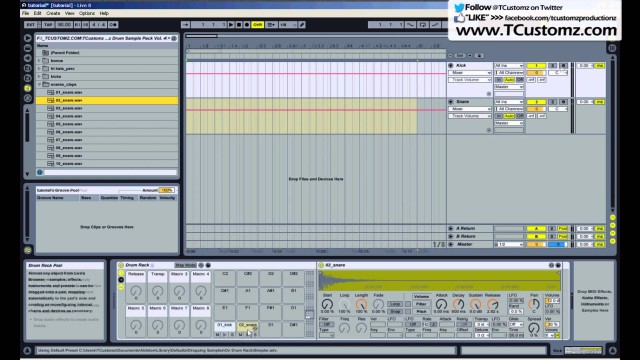
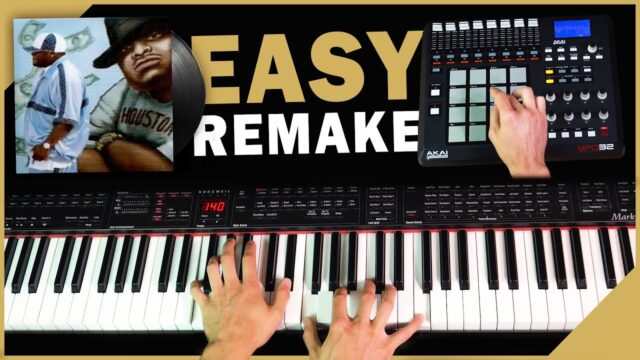
I’ve had some requests come in recently via my YouTube channel to make a tutorial explaining the idea of Low End Theory – a technique that many sampled-based Hip Hop producers use to create their bass lines and one that’s been around since the birth of Hip Hop in the early 80s.
I used this technique in a lot of my earlier production – But I don’t use it as much in my more recent beats, and later I’ll discuss some pros and cons to using it.
What is Low End Theory?
The idea with Low End Theory is to extract the original bassline from the sample that you’re using, and then “tweak” it in such a way that it is more prominent in your beat. That way if you’re aren’t skilled at creating your own bass, this will allow you to “beef up” your low end without actually having to compose a bass line.
What Do I Need to Apply Low End Theory?
- Low-Pass Filter (LPF) or Multiband EQ
- Basic Compressor (optional, only if needed)
Steps to Apply Low End Theory (as discussed in the video above)
- Duplicate your sample track.
- Apply a LPF or EQ to filter out the higher frequencies so you are left with the bass only. (Note: Unlike a filter, a multiband EQ will also enable you to emphasize certain lower frequencies if needed)
- Rename the track to something like “Bass” or “LPF” to let you know it is the filtered/EQed track.
- Apply basic compression if the bass line has varied volumes. The compressor will “smash” down or “compress” the bass to give you a more uniform sound.
- Lastly, apply a high-pass filter (HPF) to the original sample track. This will remove the low frequencies from the main sample, and now all of the bass is in your newly-filtered track! Since your low end is now contained in a separate track, you can do any additional processing (if necessary) to the bass itself without affecting the original sample (adjust volume, distortion, etc).
Keep in mind…
There’s no exact science to applying this technique. Depending on the sample you are using and the bass that’s included in it, you can be somewhat limited.
Pros to using Low End Theory
- It’s a relatively easy and straight forward technique to apply. I recommend trying some of the basic steps discussed above and experimenting with the overall processing on a trial and error basis.
Cons to using Low End Theory
- It can sometimes “muddy” up the mid to low frequencies – and it may be difficult to get the clarity you are wanting for your overall mix.
- You are limited to whatever bass line is being used in the original sample. This is why I highly recommend you learn how to compose your own bass lines.
In Summary
All in all, this is pretty much the concept behind Low End Theory - extracting the bassline from your sample, and then tweaking it to your liking. Hopefully this offers some insight.
If you have any questions or have your own bass line tips to share, feel free to drop a COMMENT below.
DOWNLOAD the FREE “TCustomized” Ableton Live Template Set below
Video Transcript:
It’s producer TCustomz, with TCustomz.com. And today I want to talk about how to change the default Ableton Live template set, and hopefully by doing that it will allow you to keep your beat sessions more organized and really help you delve into making music a lot quicker.
So by default, the Live session only includes a single audio track and a single MIDI track. And that will do okay to get you started, but ideally you want to create a custom set to complement your own work flow. Just to show you an example, let me open up one of my customized sets, and let you see what I’m talking about.
So this is the main template that I use for most of beat sessions. And what you see over here on the right is I’ve grouped together a bunch of different instruments. I’ve got my drums separated from my hi hats, percussion, etc. I’ve got an audio track down here that’s just called “sample” because I do a lot of sample-based production. So this is just an audio track for me to drag over a sample and then I can do my slicing and everything from this.
Under the drums you’re going to see the first track is just an audio track – if I wanted to drag over some sort of a drum break or any kind of audio samples. And then the rest of what you’re going to see is – these are all MIDI tracks, and in each of them I have loaded a drum rack. And it’s kind of the same principle I used for the rest of these – I’ve got an audio track, and then I’ve got other MIDI tracks with drum racks in them.
It really does a lot of the initial administrative work for you. You already have that ready – you save this as a template and then you’re ready to go. You’ve already got your tracks – you can just drag over the samples – whatever you’re going to use, whatever sounds, and you’re ready to go. You don’t have to worry about creating a new MIDI track and then dragging over a drum rack and all that sort of thing.
Now you might ask: Why can’t you just put all of your drum sounds, for instance, into a single drum rack? A kick, snare – why do you need independent drum racks for each of those sounds?
The quick answer is you can – you can put them all in a single drum rack. The problem is when you start going into the mixing phase and you’re trying to tweak individual sounds within a single drum rack. When you have them separated – when you switch over into the session view, you’ve already got your controls over each of the sounds independently. So that’s really the main reason that I like to separate them out, so I’m already ready when I go into the mix – I don’t have to worry about separating instruments, and that sort of thing.
So this isn’t to limit you – to put you into a box or constraint by doing this. It’s really to give you a basis to start from and foundation to work with when you’re making your beats. I know everybody does their own style of production and everyone has their own preferences and style workflow, so you obvious would need to tailor this to whatever is best suited for you and your production.
Once you have a template set customized, to Save your Template all you have to do is go to “Options” > “Preferences” > File Folder > “Save” Current Set as Default. And that saves the set. So every time you start a new Ableton session, it will launch that set for you.
Also, to Create a “Group” for your Ableton session:
- “Select” all of the tracks you would like included into the group (audio and/or MIDI)
- “Right Click” > “Group Tracks”
- Note: You can also “Name” your group and change the color to make it stand out
Overall, my recommendation would be to experiment with creating a customized set – play with some of the different things and figure out what’s best suited for you.
What I’m also going to do is include this custom set for free download (scroll to top) – that way you can play around with it and see what I did. It’s not anything too complicated, but like I said it’s just a foundation to work with versus using the single-audio, single-MIDI default session.
In summary, I really think putting one of these customized sets together is worth while. It’s definitely going to help you stay organized and really help you speed up your workflow and put together music a lot quicker than you normally would.
If you have a questions or comments, feel free to drop them below.
In this Ableton Live tutorial, I explain how to pitch (or transpose) a sample by mapping a global macro to be used with an Akai MPD32 or other midi controller. The great part about using Akai products (MPD32, MPK49
, etc) with Ableton Live is that you instantly have access to a “local” midi map which you can use automatically. Watch the video below for a more in-depth explanation.
Drop a comment and let me know if this was helpful in any way. Or drop a request for an upcoming tutorial you would like to be covered.
Visit the Official TCustomz YouTube Channel for more Videos | SUBSCRIBE HERE
TCustomz.com, your #1 source for authentic Hip Hop instrumentals & drum kits!
I just dropped a new all-composed beat, entitled “Not As It Seems”, and also shot a quick re-creation video to step through each of the instruments that were used. You can play the beat in its entirety at the end of the video, or you can preview and purchase the HQ/untagged beat with instant delivery here.
You can also choose the FREE Download option if you would like to work on a song first before purchasing a license. If you liked the video, please take a second to drop a Comment, Thumbs Up & Subscribe to the Youtube Channel.
Here is the Part 2 bass line tutorial as promised. Instead of this being two-part series as I had first mentioned, I have included extra info in this tutorial to help you in preparation for recording your bass line and Part 3 will cover the final recording process.
This tutorial covers:
Filtering the Sample using a High-pass Filter (HPF): By applying a HPF to your sample, you will be removing some of the lower (bass) frequencies and allowing room for the bass line you are going to compose. As I mention, I usually set my filter threshold at around 200-300 Hz. If you don’t apply a filter to your sample, you may run into problems with the low-end frequencies clashing during your mixing process.
Picking a Bass Sound: Picking an appropriate bass sound really comes down to your personal preference and the track that you’re working on. I highly recommend Spectrasonics Trilian if you are looking for a solid bass virtual instrument to use with your DAW. There are a ton of awesome presets and the patches are pretty easy to tweak if needed.
Finding the Key: Having some music theory under your belt (as I talk about in the Bass Line Tutorial Part 1) is very helpful when trying to identify the key of your sample. BasicMusicTheory.com has some good information to get you started.
Transpose the Bass to a “Playable” Key: For those of you who aren’t fluid at playing the keys, this step should help you out. This will help you transpose a key like C#m:
and transpose it into a more “playable” key like Am, where you are only playing white keys:

Hopefully this offers you some more insight into the process I go through to create a bass line for a sampled beat. If you missed the Part 1 tutorial, you can watch it here.
SUBSCRIBE to our Youtube Channel for all our latest beat making videos and tutorials!
Until next time, Happy Beat Making! – www.TCustomz.com
Feel free to drop a comment below
In this beat making video, I create a new soul-sampled Hip Hop beat entitled “Been A Minute” using an Akai MPD32 and Ableton Live 8. If you like this video, please take a second to drop a Comment, Thumbs Up & Subscribe. The full-length, HQ & untagged version of this beat is available for purchase at www.TCustomz.com with Instant Delivery!
In this step-by-step tutorial, I break down the process of making a sampled Hip Hop beat, entitled “You Already Know”. This instructional video covers all aspects of creating this track including:
SAMPLE
- Chopping up the sample and making a basic sequence
- Adding Effects to the sample including: Attack, EQ/filtering, Widening & Reverb/Delay.
DRUMS & HI HATS
- Creating a drum track and layering various drum samples
- Processing drum samples using parallel compression (also known as New York compression)
- Quantization & velocity variation
- Applying Ableton Live grooves (MPC swing in this case) to get an unquantized, Hip Hop sounding drum track.
BASS LINE
- Loading a single bass note into an Ableton sampler, and playing it across a full keyboard
- Having two bass line tracks (one pitched up an octave) running in parallel
PERCUSSION & TRANSITION FX
- Adding some “sprinkles” to the beat
HOOK
- Finding additional sample stabs for the hook
- Adding a synth melody using Spectrasonics Omnisphere vsti (awesome plugin!)
FINALIZATION
- Final sequencing of the beat (multiple verses, variations, dropouts, etc)
- Adding finishing FX
- Mixing & Mastering (Live’s Analog warmth & iZotope Ozone)
If this video was helpful, please take time out to check out the other videos on the YouTube Channel (don’t forget to subscribe!)
TCustomz.com, your #1 source for authentic Hip Hop beats & drum kits!
In this beat making tutorial I show you how to apply an MPC style drum groove (as well as SP1200 & Logic drum groove) to a quantized drum track using Ableton Live. Using Live’s built-in swings is an excellent way to humanize your drum sequences without having to manually change the timing of the drums. Having a loose, unquantized drum groove can give your Hip Hop beat that extra head-nodding factor you’ve been looking for!
The drums used in this tutorial are included in the TCustomz Drum Sample Pack Vol. 2. For more Beat Making & Ableton Live Tutorials, visit the Official TCustomz YouTube Channel (and SUBSCRIBE HERE)
TCustomz.com, your #1 source for authentic Hip Hop beats & drum kits!
This is a quick beat making tutorial showing you the different effects that I add to most of my sampled beats. As I mention in the video, I have talked about many of these effects before in some of my other Ableton Live tutorials, but I wanted to make a video dedicated to this.
In this video I discuss the following:
1) Pitching your Sample: Once the sample is chopped (in this case I am using an Ableton Live Drum Rack), the first thing I like to do is find the appropriate pitch and tempo for the sample. Using the transpose is an excellent way to achieve this.
2) Adding Attack to your Sample: Using an attack is recommended for most sampled beats, especially if you tend to chop your samples on an existing kick or snare drum. Adding a small attack to each of your sample slices will allow each one to quickly fade in once it is triggered. This allows space for you to create your own drum track over top of the sample without conflicting with the original drums.
3) EQ / Filtering your Sample: Filtering the bass out of your sample with a high-pass filter (HPF) is also recommended to allow room for a new bass line – unless, of course, you are planning to use the bass line from the existing sample, using a technique like low end theory. For this particular beat, I added a multiband EQ so that I could also remove some of the high frequencies from the sample.
4) Widening your Sample: Widening is technique used to take advantage of the stereo field. For more information, check my video tutorial on how to widen your sample.
5) Adding Delay / Reverb to your Sample: Lastly, I talk about adding delay and/or reverb to your sampled instrumentals. These are great effects for blending your sample chops together and making them more cohesive.
If this tutorial was helpful, please make sure to check out the Official TCustomz.com YouTube Channel (don’t forget to SUBSCRIBE). You can also “LIKE” the TCustomz Facebook Page and “FOLLOW” @TCustomz on Twitter.
TCustomz.com, your #1 source for authentic hip hop beats & drum kits!
_________________________
“FOLLOW” @TCustomz on Twitter
“LIKE” us on Facebook >>> facebook.com/tcustomzproductionz

A couple requests came in for a tutorial on layering drum samples. Well… here it is! In this video, I show you step-by-step how to layer your drum sounds using Ableton Live Drum Racks. The cool thing about using this technique is that you can trigger multiple drum sounds from a single midi note!
If this video helped out, please make sure to “Thumbs Up”, Comment & Subscribe to the YouTube Channel.
FREE BEAT & DRUM KIT!
NOTE: If you did NOT receive your free gifts via email, please make sure to check your spam/junk folder.


Simply tell us where to send your FREE Beat & Drum Kit below!
NO WAIT. INSTANT DELIVERY!
"LIKE" our Facebook Page as a way of saying thank you! Plus receive updates, discounts, music tips, & more!
Recent Posts
- Sample Hip Hop Beat Making Video – “Forever” (prod. by TCustomz)
- New TCustomz Productionz Facebook App!
- Sampling Tip: How to Pick an Appropriate Sample for your Beat
- Low End Theory – How To Filter a Bass Line for a Sampled Hip Hop Beat Tutorial
- How to Change the Default Ableton Live Template Set (Tutorial) & FREE Custom Set


