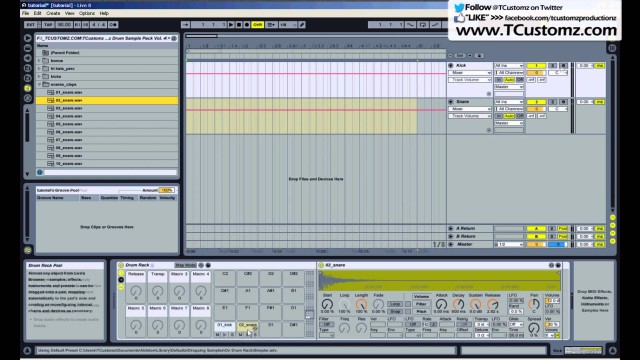
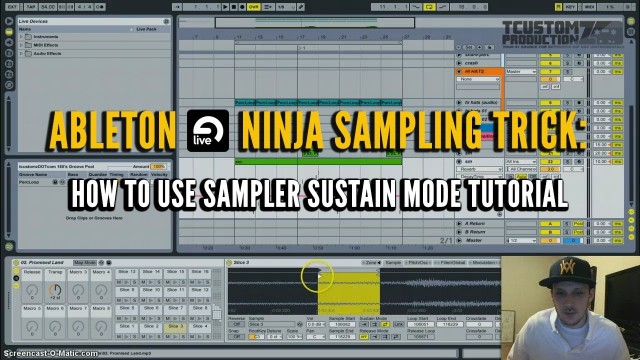
Currently viewing the tag: "ableton"


DOWNLOAD the FREE “TCustomized” Ableton Live Template Set below

Video Transcript:

It’s producer TCustomz, with TCustomz.com.  And today I want to talk about how to change the default Ableton Live template set, and hopefully by doing that it will allow you to keep your beat sessions more organized and really help you delve into making music a lot quicker.

So by default, the Live session only includes a single audio track and a single MIDI track.  And that will do okay to get you started, but ideally you want to create a custom set to complement your own work flow.  Just to show you an example, let me open up one of my customized sets, and let you see what I’m talking about.

So this is the main template that I use for most of beat sessions.  And what you see over here on the right is I’ve grouped together a bunch of different instruments.  I’ve got my drums separated from my hi hats, percussion, etc.  I’ve got an audio track down here that’s just called “sample” because I do a lot of sample-based production.  So this is just an audio track for me to drag over a sample and then I can do my slicing and everything from this.

Under the drums you’re going to see the first track is just an audio track – if I wanted to drag over some sort of a drum break or any kind of audio samples.  And then the rest of what you’re going to see is – these are all MIDI tracks, and in each of them I have loaded a drum rack.  And it’s kind of the same principle I used for the rest of these – I’ve got an audio track, and then I’ve got other MIDI tracks with drum racks in them.

It really does a lot of the initial administrative work for you. You already have that ready – you save this as a template and then you’re ready to go. You’ve already got your tracks – you can just drag over the samples – whatever you’re going to use, whatever sounds, and you’re ready to go. You don’t have to worry about creating a new MIDI track and then dragging over a drum rack and all that sort of thing.

Now you might ask: Why can’t you just put all of your drum sounds, for instance, into a single drum rack? A kick, snare – why do you need independent drum racks for each of those sounds?

The quick answer is you can – you can put them all in a single drum rack.  The problem is when you start going into the mixing phase and you’re trying to tweak individual sounds within a single drum rack.  When you have them separated – when you switch over into the session view, you’ve already got your controls over each of the sounds independently.  So that’s really the main reason that I like to separate them out, so I’m already ready when I go into the mix – I don’t have to worry about separating instruments, and that sort of thing.

So this isn’t to limit you – to put you into a box or constraint by doing this.  It’s really to give you a basis to start from and foundation to work with when you’re making your beats.  I know everybody does their own style of production and everyone has their own preferences and style workflow, so you obvious would need to tailor this to whatever is best suited for you and your production.

Once you have a template set customized, to Save your Template all you have to do is go to “Options” > “Preferences” > File Folder > “Save” Current Set as Default. And that saves the set.  So every time you start a new Ableton session, it will launch that set for you.

Also, to Create a “Group” for your Ableton session:

  1. “Select”  all of the tracks you would like included into the group (audio and/or MIDI)
  2. “Right Click” > “Group Tracks”
  3. Note: You can also “Name” your group and change the color to make it stand out

Overall, my recommendation would be to experiment with creating a customized set – play with some of the different things and figure out what’s best suited for you.

What I’m also going to do is include this custom set for free download (scroll to top) – that way you can play around with it and see what I did.  It’s not anything too complicated, but like I said it’s just a foundation to work with versus using the single-audio, single-MIDI default session.

In summary, I really think putting one of these customized sets together is worth while.  It’s definitely going to help you stay organized and really help you speed up your workflow and put together music a lot quicker than you normally would.

If you have a questions or comments, feel free to drop them below.

I just dropped a new all-composed beat, entitled “Not As It Seems”, and also shot a quick re-creation video to step through each of the instruments that were used.  You can play the beat in its entirety at the end of the video, or you can preview and purchase the HQ/untagged beat with instant delivery here.

You can also choose the FREE Download option if you would like to work on a song first before purchasing a license.  If you liked the video, please take a second to drop a Comment, Thumbs Up & Subscribe to the Youtube Channel.

Tagged with:
 

I’m back with a new Hip Hop beat making video, where I’m sampling a soul record.  I step through most of the elements that went into the beat, from chopping the sample, to laying down the drum track,  to adding a couple filtered breakbeats for ambiance, and the final percussion and bass line.  I also added a vocal sample for the hook which will play at the end of the video.  The gear I am using is an Alienware M17x, Ableton Live 8 (DAW), Akai MPD32 (with modified pads) & an M-Audio Fast Track Ultra audio interface.

If you liked the video, please take a second to drop a Comment, Thumbs Up & Subscribe to the Youtube Channel.  Also, the full-length, HQ beat is available for purchase at www.TCustomz.com with Instant Delivery along with our extensive instrumental catalog!

Tagged with:
 

A couple requests came in for a tutorial on layering drum samples. Well… here it is! In this video, I show you step-by-step how to layer your drum sounds using Ableton Live Drum Racks. The cool thing about using this technique is that you can trigger multiple drum sounds from a single midi note!

If this video helped out, please make sure to “Thumbs Up”, Comment & Subscribe to the YouTube Channel.

Tagged with:
 

So I decided to put together another beat making video – and no, I haven’t forgot about the Part 2 Bass line tutorial and the other requests you all sent in! Those are coming next!

In this video, I re-create my newest Hip Hop instrumental, entitled “No Guarantees” – a license to this beat is available for purchase at TCustomz.com.

This beat is 100% composed and contains no samples!

To stay up-to-date on all the latest beat-making videos, Ableton Live tutorials & more, SUBSCRIBE to the TCustomzDOTcom Youtube Channel today!

Visit our official website to buy authentic Hip Hop beats for sale.


So I just finished this beat making video for my newest beat, “In My Groove”.  I would describe this one as an M-Phazes style track – very soulful with hard hitting drums, but also has atmospheric and jazzy elements to it as well.

This was my first attempt at any real video editing, so keep that in mind.

Please take a quick second to Subscribe to the tcustomzDOTcom YouTube Channel and “LIKE” the Facebook Page.

Join the official TCustomz.com Newsletter to receive FREE Beats & Drum Kits!

Tagged with:


So I had some requests in previous months for another another Beat making tutorial.  I hadn’t done one of these for a while, so I wanted to give you guys a little insight into my process for making a sampled beat.

This one steps through a new Underground, Hip Hop beat, entitled “In the End”.  I touch on all the the different elements that went into the beat as well as a small discussion on a technique for sampled bass lines, called Low End Theory.  Make sure to watch until the end so you can hear the completed, full-length beat.

If you like this video and would like me to do more of these, please make sure to drop by my YouTube Channel and SUBSCRIBE!

Also, I am constantly updating my Facebook Page (Make sure to “LIKE”) and Official Website will all relevant information as well as Beats, Drum Kits, and other FREE stuff!